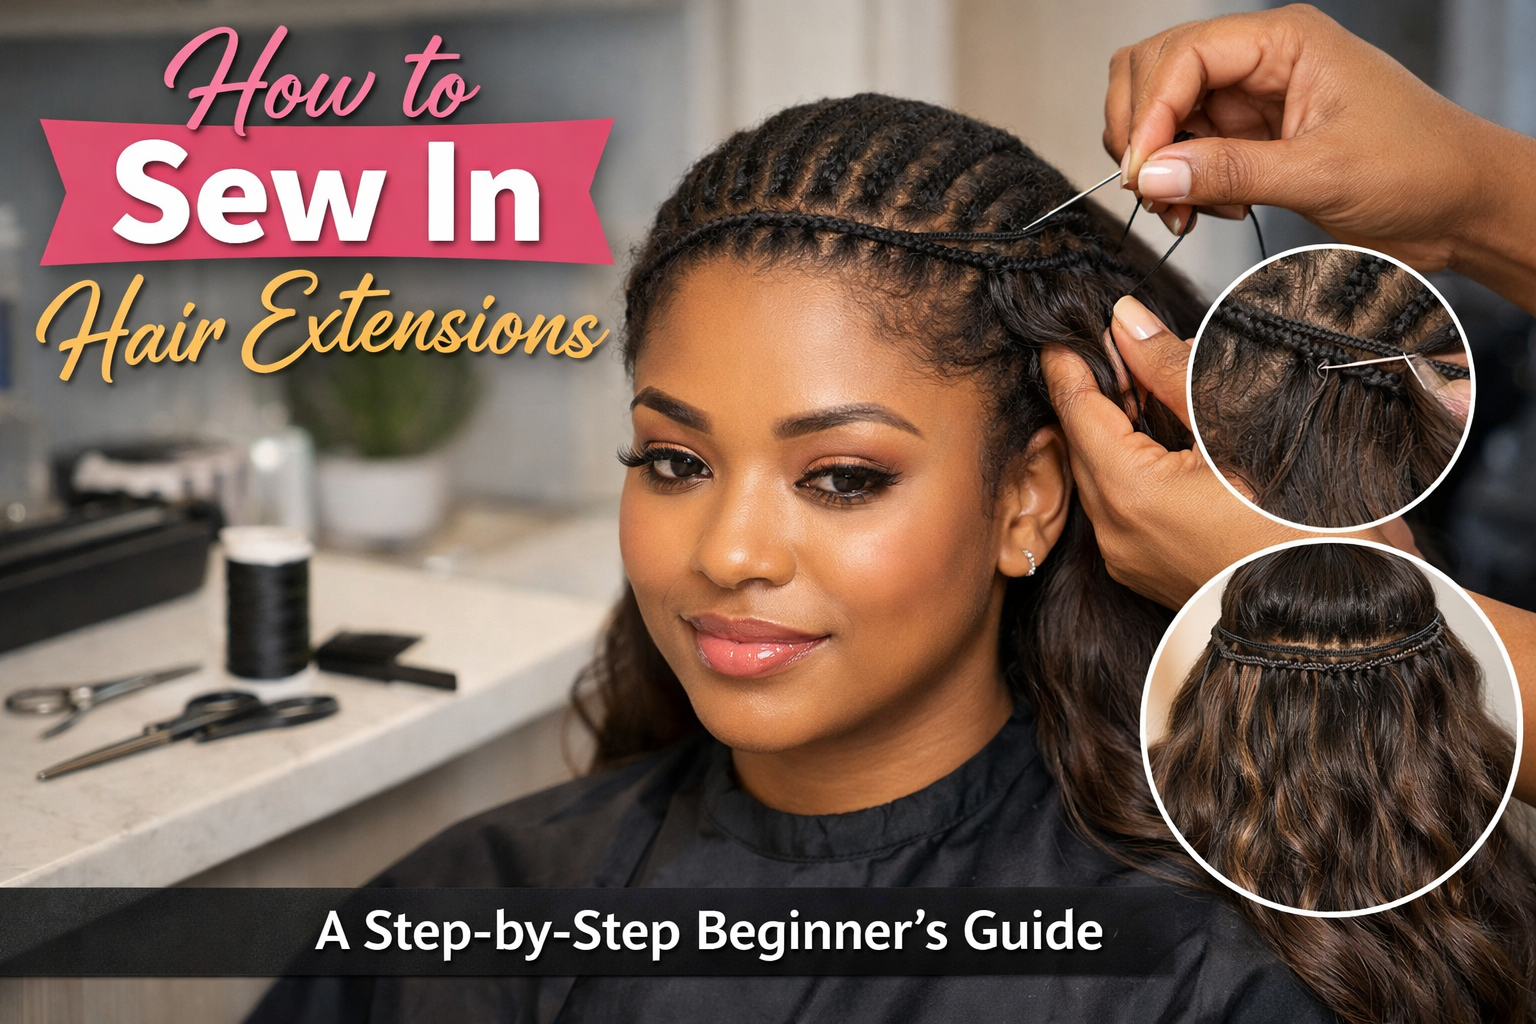
How to Sew In Hair Extensions: A Step-by-Step Beginner’s Guide
Hair extensions have proven to be one of the most popular ways to change one's look without waiting months for the hair to grow. Whether it is adding volume or growing long flowing locks, sew-in hair extensions have proven to be one of the best ways to achieve the look desired. If you have ever wondered how to sew in hair extensions, you are not alone. In fact, there are countless people who want the look of long flowing locks but have wondered about the process.
However, the good news is that it is easier than it seems when one is able to follow a step-by-step approach. In fact, the hair extension industry is growing at a tremendous pace. According to reports, the hair extension industry is expected to grow to be valued at more than 10 billion USD by the year 2027 as people continue to look for ways to style their hair and protect their locks at the same time. In fact, sew-in hair extensions have proven to be one of the best ways to achieve the look desired.
This beginner's guide will cover everything there is to know about sewing in hair extensions.
What Are Sew-In Hair Extensions?
Sew-in hair extensions are a protective style for women in which hair extensions are stitched to their natural hair using a needle and thread. These hair extensions are stitched to cornrows, which are then used as a base for these hair extensions.
Sew-in hair extensions are commonly used by hairstylists since these hair extensions are stitched to natural hair and thus do not require glue or heat to be applied to natural hair. This is beneficial in that it does not damage natural hair.
Hair extensions are weft-based bundles, which are then stitched to natural hair.
Tools You Need Before Installing Extensions
Preparation is the first step to a successful process, and the basic tools required are as follows:
Curved weaving needle
Weaving thread, matching the color of the hair
Hair clips, used for sectioning the hair
Rat tail comb
Scissors
Hair bundles/wefts
Moisturizing products, used for natural hair
Good quality hair extensions are a crucial factor in the final result of the process, as they make a huge difference. Many people prefer working with human hair wefts, as they are easy to blend with natural hair, unlike synthetic hair, which cannot be styled with a blow dryer.
Step 1: Prepare and Wash the Natural Hair
Healthy hair preparation is a necessity before installing hair extensions.
To begin with, wash the hair with a mild shampoo, followed by a deep conditioner. This helps ensure that the scalp remains healthy during the period of time the hair extensions are worn.
Next, allow the hair to dry completely before braiding. A light leave-in conditioner or oil should be used to keep the scalp moisturized.
Step 2: Create the Cornrow Base
As discussed, the cornrows are the base of the braids, which support the extension.
To create the braids, a rat tail comb is used to section the hair into horizontal parts. Braiding begins at the front of the head, progressing backward toward the back of the head. The braids are tightly braided but not so tight as to be painful.
A good braiding pattern for beginners is the straight-back braiding style. In some instances, a circular braiding pattern, also known as a beehive pattern, is used to ensure a more natural flow, especially when sewing bundles of weft hair extensions.
Once braiding is complete, the ends of the braids are secured with a small rubber band.
Step 3: Prepare the Weft Bundles
Prior to sewing, the extension wefts are measured against the braids.
Wefts are cut to the width of each individual braid so they are comfortable along the braids, also known as the cornrows. In some instances, the wefts are folded instead of cut to avoid excessive shedding.
For those who are connected with salons or suppliers, Machine weft hair extension supplier are used because they are more durable and easier to install, even for a novice.
Step 4: Thread the Needle
Take your weaving thread and insert it through the curved needle. Tie a small knot at the end of the thread to avoid it from passing through the braid.
The use of a curved needle is recommended since it glides through the braids and extension wefts without pulling on the hair excessively.
Step 5: Start Sewing the Extensions
Take your first weft and place it on the lowest braid at the back of the head.
Insert your needle through the braid and weft, making sure you pull your thread through so that it does not come out from the end where you knotted it. Continue sewing through the braid using a series of loops. Each loop should be about a centimeter apart.
This is where you need a lot of patience in your sewing activity. Take your time to ensure your extensions lie flat on your braids.
As you move up along your head, you will need to repeat this procedure on all your braids.
Most salon operators buy hair bundles in bulk from a wholesale hair extensions distributor in order to maintain quality for sewing services.
Step 6: Fold the Weft at the Ends
At the end of each braid, rather than cutting it, fold it in the opposite direction. By sewing through this part, it will provide a stronger hold and also reduce shedding.
Sew through the next row until all braids are covered with hair extensions.
Step 7: Blend and Style the Hair
The final stage in this guide on how to install extensions is blending.
Leave out a section of your hair at the top or on one side for covering all the wefts. You can trim them if you want them to blend well with the left-out section.
You can now style your hair in a variety of ways, including curls, straightening, or waves.
How Long Do Sew-In Extensions Last?
A good install of a sew-in usually lasts six to eight weeks, depending on proper care.
Scalp cleansing, moisturizing, and proper styling are all important in keeping the extensions in good condition, as well as the natural hair underneath.
Care should be taken not to pull on the braids, as this can cause the braids to weaken at the roots.
Benefits of Sew-In Hair Extensions
Sew-in extensions still remain one of the most trusted methods for many reasons:
Long lasting hold
They can last for weeks without the need for regular adjustments.
Natural appearance
The wefts lie flat against the scalp, giving a seamless finish.
Protective styling
Natural hair is braided under and protected from regular heat and styling damage.
Styling versatility
They can be styled in many ways, such as curled, straightened, and colored, depending on the quality of the hair.
Common Beginner Mistakes to Avoid
Despite the fact that it is easy for a beginner, there are a few errors that many first-time users make.
Braiding too tightly
Braids that are too tight can cause pain and damage to the hair.
Not preparing the hair
Hair that is not washed can cause buildup and irritation on the scalp.
Sewing too loosely
Hair extensions sewn loosely can cause them to sag after a few days.
Using low-quality hair extensions
Hair extensions of poor quality can cause tangles and reduce the lifespan of the style.
Taking your time and using proper techniques will make the process easier and more comfortable.
Final Thoughts
However, it may seem intimidating at first to learn how to sew in hair extensions, but it is actually very easy once you know the steps involved in the process. From cutting and preparing the hair to sewing in each of these wefts, it is all about patience.
Sew-in hair extensions remain to be one of the favorite options for hairstylists and for those who use these hair extensions for personal use. If you are looking to try out something new with your hair, such as having long hair, or simply adding some extra volume to your existing hairstyle, then it is very important to master this technique.
As long as you have all the equipment needed and some knowledge of how to use it, you are ready to go and try out your own sew-in hair extension look.
FAQs
1.) How long does it take to install sew-in extensions?
For beginners, it takes 2 to 3 hours to install sew-in hair extensions depending on their braid style.
2.) Do sew-in hair extensions harm natural hair?
Sew-in hair extensions are safe for your natural hair as long as it is installed correctly and braided loosely.
3.) How often should sew-in hair extensions be removed?
Sew-in hair extensions should be removed after 6 to 8 weeks.
4.) Can you wash your hair with sew-in hair extensions?
Yes, it is very important to wash your scalp when you have sew-in hair extensions.
5.) Are sew-in hair extensions for all hair types?
Yes, it works well for all hair types as long as it is installed correctly.

 (1).jpg)
 (1).jpg)
.jpg)